I have several solutions that need to reference assemblies in another solution. For many years, I used assembly/DLL references, because the other solution is our "Core Framework" solution, and I didn't want other programmers messing around with our framework classes. At another company that I worked at, that happened all too often. Then I'd have to go back in and fix all the bugs they put into *my* Framework classes!!! Without the projects being in the solution, it wasn't as likely that someone would go in and mess around with those classes.
But assembly references can cause issues too (such as outdated assemblies and problems with automated Builds, to name just two). So I finally relented and started adding the necessary Core Framework projects to each new solution and then any new projects for that solution could have project references to the Framework instead of assembly references. All was well for a while, but then several months ago, the problems began.
In a new solution that included Framework projects, I started getting "red squigglies" everywhere for one particular Framework project, showing the usual error when I moused over: "blah blah blah does not exist (are you missing an assembly reference?)". None of the other Framework projects have had problems, only this one. The using directive for that project's namespace had the squiggly and any class that was in that namespace also had squigglies. And Intellisense wouldn't work for any method calls, etc. And here's the weird part: with all those errors, everything still built fine on my computer (and on the Build server)!!
I'm using Visual Studio 2017. I was at version 15.8.something, which was not the latest version. So, I thought that I needed to update (because nobody else had the problem), so I'm now at the latest version (15.9.17) and it did NOT help! =0(
Googling for "Visual Studio 2017 missing project references" offered all kinds of suggestions. Clean the solution and build. Clean the solution and rebuild. Delete the obj folder and reopen VS. Add dependency references. Remove the project and add it back in. Remove the reference and add it back in. And many more that I don't even remember right now ... none worked!!!
I would periodically, drop my search for a fix and continue working for a while. Until the fact that I had no Intellisense started driving me nuts again and I'd search some more. This went on like this for months. Until I finally found something that worked!!!
Someone on some Forum (StackOverflow, I think) suggested unloading the problem project. The red squigglies suddenly disappeared! And Intellisense was back! The project reference is still there (because unloading doesn't affect the .sln at all, which is nice because I don't have to worry about checking it into source control, since there's no change, and it won't affect any of the other developers).
All you have to do is right-click the offending project in the Solution Explorer and choose "Unload Project" (it's down towards the bottom of the menu). The project remains displayed in the solution, but is marked as "(unavailable)". If you need to, you can always right-click it again and choose "Reload Project".
I have no idea why this works (I tried to Google to find an answer to that question), but after trying off-and-on for months to find a solution to my problem, I'm not going to "look a gift horse in the mouth", as they say!
Now I can continue with my Happy Coding! =0)
Saturday, November 23, 2019


Sunday, November 03, 2019
Printing Your WinForm
Many developers still use WinForms (Windows Forms), and I frequently see questions on the Forums about how to print your Forms. I think this type of question might be asked by developers wanting to have a printed version of their forms, with data filled in, to maybe show to a prospective customer. Or, maybe the application contains an Invoice Form with customer data to be printed to include with a customer purchase. I'm sure there are lots of reasons for wanting this functionality.
I have seen many examples of how to do this when Googling, and some work better than others. Some of the issues I've seen include not taking into account multiple monitors ... it only works with your main laptop/tablet screen, or the image ends up spanning your laptop screen plus all of your monitors (I use two external monitors ... imagine three screens crammed onto one page)! Not exactly what you're looking for, is it?
After a bit of trial-and-error, cobbling together bits and pieces from various other sources that I've found with Google, I've come up with this. It works pretty well, I think. Call this PrintForm() method from a button click:
The PrintPage EventHandler gets called for both the Print and the PrintPreviewDialog, so all the necessary code is in this event handler:
Have fun and Happy Coding! =0)
I have seen many examples of how to do this when Googling, and some work better than others. Some of the issues I've seen include not taking into account multiple monitors ... it only works with your main laptop/tablet screen, or the image ends up spanning your laptop screen plus all of your monitors (I use two external monitors ... imagine three screens crammed onto one page)! Not exactly what you're looking for, is it?
After a bit of trial-and-error, cobbling together bits and pieces from various other sources that I've found with Google, I've come up with this. It works pretty well, I think. Call this PrintForm() method from a button click:
public void PrintScreen()
{
    System.Drawing.Printing.PrintDocument oDoc = new System.Drawing.Printing.PrintDocument();
    oDoc.PrintPage += new System.Drawing.Printing.PrintPageEventHandler(oDoc_PrintPage);
    PrintDialog pd = new PrintDialog();
    pd.PrinterSettings = new System.Drawing.Printing.PrinterSettings();
    pd.Document = oDoc;
    oDoc.DefaultPageSettings.Landscape = true;

    // print like this:
    //if (pd.ShowDialog() == DialogResult.OK)
    //{
    //    oDoc.Print();
    //}

    // for now, let's just use the print preview to demonstrate
    PrintPreviewDialog ppd = new PrintPreviewDialog();
    ppd.Document = oDoc;
    ppd.ShowDialog();
}
The PrintPage EventHandler gets called for both the Print and the PrintPreviewDialog, so all the necessary code is in this event handler:
private void oDoc_PrintPage(object sender, System.Drawing.Printing.PrintPageEventArgs e)
{
    // First, let's get the image of this running Form that we want to print
    Bitmap formBitmap = new Bitmap(this.Width, this.Height);
    this.DrawToBitmap(formBitmap, new Rectangle(0, 0, this.Width, this.Height));

    // for clearer images
    e.Graphics.SmoothingMode = System.Drawing.Drawing2D.SmoothingMode.AntiAlias;
    e.Graphics.TextRenderingHint = System.Drawing.Text.TextRenderingHint.AntiAliasGridFit;
    e.Graphics.InterpolationMode = System.Drawing.Drawing2D.InterpolationMode.HighQualityBicubic;

    // this bit of code is needed to figure out if we need to scale the bitmap to fit the page
    // (there is an implicit conversion from int to float)
    float neededWidth = this.Width;
    float neededHeight = this.Height;

    float availableWidth = e.PageBounds.Width;
    float availableHeight = e.PageBounds.Height;

    double neededRatio = neededWidth / neededHeight;
    double availableRatio = availableWidth / availableHeight;
    float fitRatio = 1;

    if (neededRatio >= availableRatio)
        fitRatio = availableWidth / neededWidth;
    else
        fitRatio = availableHeight / neededHeight;

    // The Min size needs to be converted to int for the DrawImage() method.
    int newWidth = Convert.ToInt32(Math.Min(neededWidth * fitRatio, availableWidth));
    int newHeight = Convert.ToInt32(Math.Min(neededHeight * fitRatio, availableHeight));

    e.Graphics.DrawImage(formBitmap, 0, 0, newWidth, newHeight);
}
Have fun and Happy Coding! =0)
Monday, September 30, 2019
Parsing Data With Metadata
Recently, I had worked on some parsing routines for messages received from another vendor. The messages come via TCP, but that's not relevant to this discussion. What I wanted to talk about is how a "generic" type of parsing mechanism ended up being useful for parsing data that is received in more than one format. The vendor initially only sent messages in a pipe-delimited fashion, which is how the parsing routine was originally designed. Then later, they added additional messages that were XML (which we could use to Fill a DataSet). We needed to be sure that the parsing routine would work with both types of messages, because we would still be receiving both types.
Let's pretend that this example comes from a ride-sharing system (it doesn't). So we have cars and drivers and we are receiving messages about the status of each car and its location.
A pipe-delimited message might come in looking like this:
As you can see, the data is coming into my application from a hypothetical company called GeeksRide.
An XML message might come in looking like this:
For ease of comparison between the two methodologies, the XML in my example contains the same data as the pipe-delimited, although, in reality, it could be different data and different schema (column names). In the case of this hypothetical ride-sharing system, we could be receiving messages from many different companies with different data and different schema. Each type of message in your application can have different metadata, if necessary, to correspond to the various companies schemas.
What does this metadata look like? Very, very similar to the pipe-delimited data! Whether the message is coming in as pipe-delimited or XML, this pipe-delimited metadata can be used for either! Here's an example of metadata that can be used to process the data coming in with the above schema:
Let me explain what this means: each pair of values between the pipes, |XX=YY|, correspond to the name of the data coming in (XX) and the name of the column in our ride-sharing system's DataSet/DataTable (YY). Pretty simple, right?
Note that the leading and trailing pipes are optional in both the metadata and pipe-delimited input data.
OK, so now some code.
First, to simulate an incoming message, I'll just create pipeInput and xmlInput string variables. Like so:
And I'll also simulate the metadata with a string variable as well. Normally you'd get the metadata from a config file or from a database:
One more variable we'll need is a Dictionary to store the metadata in. I call it a SchemaMap:
To test all this, just call this Test method (you can set a breakpoint at the end and look at the two DataTables that now contain the data parsed from the two different input messages):
Let's start with the CreateSchemaMap, which is very simple. It fills the dictionary with the metadata:
The two Parsing methods, which I'll show first, both call a common method that puts the data into the DataRow with the proper column names, based on the metadata in the SchemaMap dictionary:
Note the comments at the beginning of each of those methods. I used Typed DataSets extensively, so I don't need to be adding any columns to a "generic" DataTable. But, you don't have to have a Typed DataSet to have a DataTable with pre-defined columns and datatypes.
And lastly, the common method that they both call:
So, now you've seen how the same metadata and (at least part of) the same code can be used to parse data out of two very different types of data. I hope that you, dear Reader, can find some use for this.
Happy Coding! =0)
Let's pretend that this example comes from a ride-sharing system (it doesn't). So we have cars and drivers and we are receiving messages about the status of each car and its location.
A pipe-delimited message might come in looking like this:
|CARCOMPANY=GeeksRide|CARNUMBER=C121|STATUS=Active|OPERATORID=2401|OPERATORNAME=Bonnie|STATUSDATE=5/24/2018 12:54:40 PM|LASTCOORDTIME=5/24/2018 12:54:55|PHONENBR=555-555-0430|X=-122.650345|Y=45.535772|As you can see, the data is coming into my application from a hypothetical company called GeeksRide.
An XML message might come in looking like this:
<RideShareDataSet>
  <RideShareCar>
    <CarCompany>GeeksRide</CarCompany>
    <CarNumber>C121</CarNumber>
    <Status>Active</Status>
    <X>-122.650345</X>
    <Y>45.535772</Y>
    <LastCoordTime>5/24/2018 12:54:55</LastCoordTime>
    <StatusDate>5/24/2018 12:54:40 PM</StatusDate>
    <OperatorID>2401</OperatorID>
    <OperatorName>Bonnie</OperatorName>
    <PhoneNBR>555-555-0430</PhoneNBR>
  </RideShareCar>
</RideShareDataSet>
For ease of comparison between the two methodologies, the XML in my example contains the same data as the pipe-delimited, although, in reality, it could be different data and different schema (column names). In the case of this hypothetical ride-sharing system, we could be receiving messages from many different companies with different data and different schema. Each type of message in your application can have different metadata, if necessary, to correspond to the various companies schemas.
What does this metadata look like? Very, very similar to the pipe-delimited data! Whether the message is coming in as pipe-delimited or XML, this pipe-delimited metadata can be used for either! Here's an example of metadata that can be used to process the data coming in with the above schema:
|CARCOMPANY=Company|CARNUMBER=CarID|EVENTNO=TripID|STATUS=Status|OPERATORID=DriverID|OPERATORNAME=DriverName|RADIOID=|EVENTTYPE=|STATUSDATE=LastStatusDateTime|LOCATION=LocationName|X=Longitude|Y=Latitude|ADDRESS=Address|DIRECTION=heading|SPEED=speed|LASTCOORDTIME=LastGPSDateTime|PHONENBR=PhoneNumber|Let me explain what this means: each pair of values between the pipes, |XX=YY|, correspond to the name of the data coming in (XX) and the name of the column in our ride-sharing system's DataSet/DataTable (YY). Pretty simple, right?
Note that the leading and trailing pipes are optional in both the metadata and pipe-delimited input data.
OK, so now some code.
First, to simulate an incoming message, I'll just create pipeInput and xmlInput string variables. Like so:
private string pipeInput = "|CARCOMPANY=GeeksRide|CARNUMBER=C121|STATUS=Active|OPERATORID=2401|OPERATORNAME=Bonnie|STATUSDATE=5/24/2018 12:54:40 PM|LASTCOORDTIME=5/24/2018 12:54:55|PHONENBR=555-555-0430|X=-122.650345|Y=45.535772|";

private string xmlInput =
    "<RideShareDataSet>" +
    "  <RideShareCar>" +
    "    <CarCompany>GeeksRide</CarCompany>" +
    "    <CarNumber>C121</CarNumber>" +
    "    <Status>Active</Status>" +
    "    <X>-122.650345</X>" +
    "    <Y>45.535772</Y>" +
    "    <LastCoordTime>5/24/2018 12:54:55</LastCoordTime>" +
    "    <StatusDate>5/24/2018 12:54:40 PM</StatusDate>" +
    "    <OperatorID>2401</OperatorID>" +
    "    <OperatorName>Bonnie</OperatorName>" +
    "    <PhoneNBR>555-555-0430</PhoneNBR>" +
    "  </RideShareCar>" +
    "</RideShareDataSet>";
And I'll also simulate the metadata with a string variable as well. Normally you'd get the metadata from a config file or from a database:
private string pipeMetadata = "|CARCOMPANY=Company|CARNUMBER=CarID|EVENTNO=TripID|STATUS=Status|OPERATORID=DriverID|OPERATORNAME=DriverName|RADIOID=|EVENTTYPE=|STATUSDATE=LastStatusDateTime|LOCATION=LocationName|X=Longitude|Y=Latitude|ADDRESS=Address|DIRECTION=heading|SPEED=speed|LASTCOORDTIME=LastGPSDateTime|PHONENBR=PhoneNumber|";
One more variable we'll need is a Dictionary to store the metadata in. I call it a SchemaMap:
/// <summary>
/// The key is the data name of the incoming data, as defined in the Metadata (pipeMetadata)
/// The value is the column name of the DataTable where we store the Parsed data, as defined in the Metadata
/// </summary>
Dictionary<string, string> SchemaMap = new Dictionary<string, string>();
To test all this, just call this Test method (you can set a breakpoint at the end and look at the two DataTables that now contain the data parsed from the two different input messages):
public void TestParsingMethods()
{
    this.CreateSchemaMap(pipeMetadata);

    DataTable dtWithPipeInput = new DataTable();
    this.ParsePipeDelimited(dtWithPipeInput, pipeInput);

    DataTable dtWithXmlInput = new DataTable();
    this.ParseXml(dtWithXmlInput, xmlInput);
}
Let's start with the CreateSchemaMap, which is very simple. It fills the dictionary with the metadata:
public void CreateSchemaMap(string schema)
{
    string[] names = schema.Split(new char[] { '|' }, StringSplitOptions.RemoveEmptyEntries);
    this.SchemaMap = new Dictionary<string, string>();

    for (int i = 0; i < names.Length; i++)
    {
        string[] s = names[i].Split(new char[] { '=' }, StringSplitOptions.RemoveEmptyEntries);
        if (s.Length == 2)
            SchemaMap.Add(s[0].ToUpper(), s[1]);
    }
}
The two Parsing methods, which I'll show first, both call a common method that puts the data into the DataRow with the proper column names, based on the metadata in the SchemaMap dictionary:
public void ParsePipeDelimited(DataTable dt, string pipeMessage)
{
    // If we're passed an undefined DataTable (one with no columns), we need to add string columns
    // as we have no way of accurately determining the type of data.
    // Typically, we'd already have defined a DataSet/DataTable with column datatypes.
    if (dt.Columns.Count == 0)
        foreach (KeyValuePair<string, string> kvp in this.SchemaMap)
        {
            if (dt.Columns.Contains(kvp.Value) == false)
                dt.Columns.Add(kvp.Value);  // default data type is string
        }

    // We'll be parsing data from the Message into this DataRow
    DataRow row = dt.NewRow();
    dt.Rows.Add(row);

    string[] nameValue = pipeMessage.Split(new char[] { '|' }, StringSplitOptions.RemoveEmptyEntries);
    string schemaKey, columnName;
    for (int i = 0; i < nameValue.Length; i++)
    {
        string[] s = nameValue[i].Split(new char[] { '=' }, StringSplitOptions.RemoveEmptyEntries);
        schemaKey = s[0].ToUpper();
        if (s.Length == 2 && SchemaMap.ContainsKey(schemaKey))
        {
            columnName = this.SchemaMap[schemaKey]; // get column name from dictionary
            this.ParseToDataRow(row, columnName, dt, s[1]);
        }
    }
}
public void ParseXml(DataTable dtParsed, string xmlMessage)
{
    // If we're passed an undefined DataTable (one with no columns), we need to add string columns
    // as we have no way of accurately determining the type of data.
    // Typically, we'd already have defined a DataSet/DataTable with column datatypes.
    if (dtParsed.Columns.Count == 0)
        foreach (KeyValuePair<string, string> kvp in this.SchemaMap)
        {
            if (dtParsed.Columns.Contains(kvp.Value) == false)
                dtParsed.Columns.Add(kvp.Value);  // default data type is string
        }

    // We'll be parsing data from the Message into this DataRow
    DataRow row = dtParsed.NewRow();
    dtParsed.Rows.Add(row);

    // Now, let's read the XML into a DataSet:
    // I suggest making this into an Extension method, it's pretty handy to have.
    DataSet dsFromXml = new DataSet();
    StringReader sr = new StringReader(xmlMessage);
    dsFromXml.ReadXml(sr, XmlReadMode.InferSchema);
    dsFromXml.AcceptChanges();

    // Most likely only one Table, but just in case
    foreach (DataTable dt in dsFromXml.Tables)
    {
        if (dt.Rows.Count == 0)
            continue;

        DataRow rowFromXml =  dt.Rows[0];
        string columnName;
        foreach (string schemaKey in this.SchemaMap.Keys)
        {
            columnName = this.SchemaMap[schemaKey]; // get column name from dictionary
            foreach (DataColumn dcFromXml in dt.Columns)
            {
                if (dcFromXml.ColumnName.ToUpper() == schemaKey)
                {
                    this.ParseToDataRow(row, columnName, dtParsed, rowFromXml[schemaKey].ToString());
                    break;
                }
            }
        }
    }
}
Note the comments at the beginning of each of those methods. I used Typed DataSets extensively, so I don't need to be adding any columns to a "generic" DataTable. But, you don't have to have a Typed DataSet to have a DataTable with pre-defined columns and datatypes.
And lastly, the common method that they both call:
private void ParseToDataRow(DataRow row, string columnName, DataTable dt, string data)
{
    foreach (DataColumn dc in dt.Columns)
    {
        if (dc.ColumnName.ToUpper() == columnName.ToUpper())
        {
            if (dc.DataType == Type.GetType("System.Double"))
            {
                double lat;
                if (double.TryParse(data, out lat))
                {
                    if (data.Contains('.'))
                        row[dc] = lat;
                    else
                        row[dc] = lat / 1000000;
                }
            }
            else if (dc.DataType == Type.GetType("System.Int32"))
            {
                int val;
                if (int.TryParse(data, out val))
                {
                    row[dc] = val;
                }
            }
            else if (dc.DataType == Type.GetType("System.DateTime"))
            {
                DateTime date;
                if (DateTime.TryParse(data.Replace('/', ' '), out date))
                {
                    row[dc] = date;
                }
            }
            else
            {
                if (string.IsNullOrWhiteSpace(data) == false)
                    row[dc] = data;
            }

            break;
        }
    }
}
So, now you've seen how the same metadata and (at least part of) the same code can be used to parse data out of two very different types of data. I hope that you, dear Reader, can find some use for this.
Happy Coding! =0)
Friday, July 26, 2019
When New Outlook 365 Updates Drive You Nuts
Sorry to depart from my usual .NET posts, but I'm hoping I can save other people from a lot of Googling.
I have Office 365, but I don't always receive the latest updates right away (I don't know why, and that's not really the subject of this post anyway ... although it *is* somewhat related ... more on that later). My Outlook finally updated to the latest version a week or two ago. The update was to Version 1906, Build 11727.20244. And, it is *AWFUL* !!!
Short and sweet: too much extra white space!! I don't have that newest version anymore, I reverted to an earlier version (which is what this blog post is about), so I can't show you screenshots of mine before I fixed it, but I found some online that I can show you (sorry for the poor quality). This is in case you haven't had this Update applied yet and so you may not have seen this:
Latest, Version 1906:
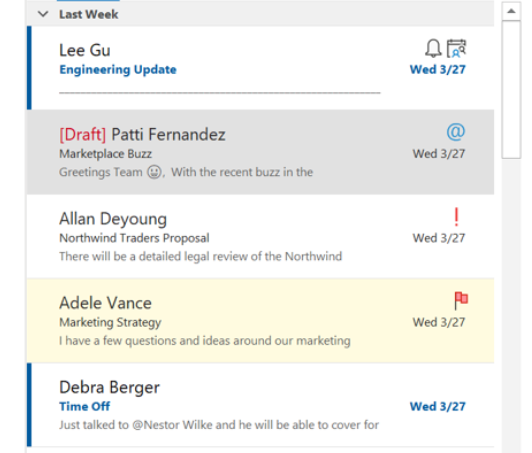
Whereas, here's what mine looks like now that I've reverted back to an older Version (I've changed my theme color to match the above screenshot ... I don't usually use this one, it's too much white).
My Reverted Version:

Wow! Big difference!!! No ridiculous extra white space!
Another example: composing an email …
Latest, Version 1906:
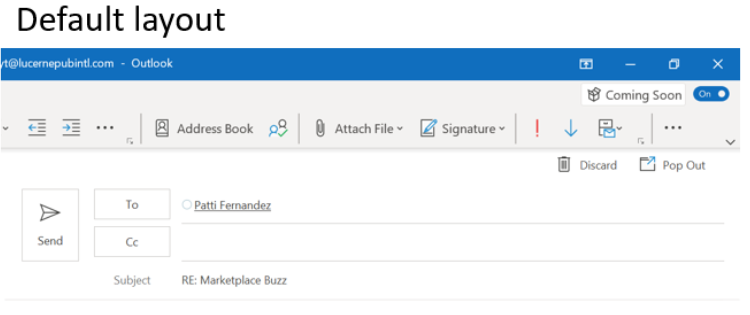
With this newest Version, there's an option on the ribbon to tighten up the spacing a little, which makes it look, like this:
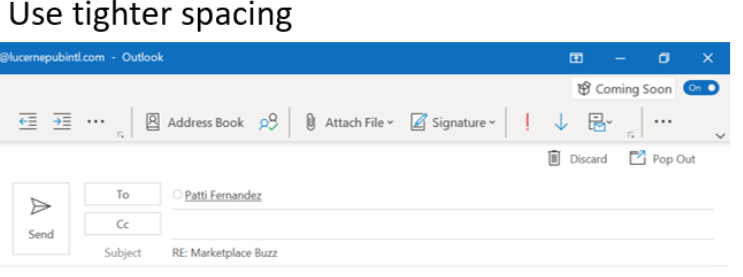
Well, OK, it's not *as* bad ... but it's still way too much wasted space! If they hadn't added all that extra white space, they wouldn't have to tighten the spacing to begin with! Give me back my old version!
My Reverted Version:
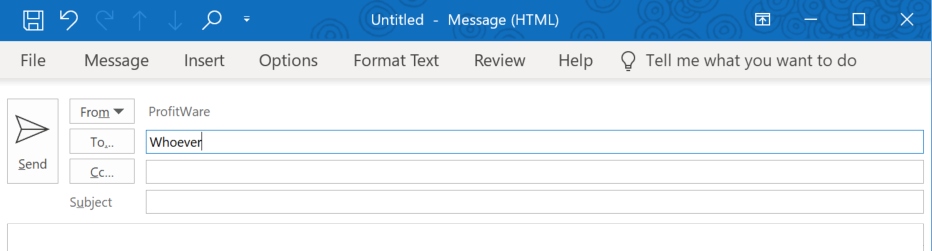
I don't usually keep the Ribbon pinned, I just drop it down when I need it. You all know what ribbon bars look like, so I won't bother with another screenshot. I like my old version much better. A lot more compact and no wasted vertical space.
I never even looked at the Calendar with the latest Version 1906, but I hear that there were similar issues there. One complaint in particular was about moving the location of various options to a different spot when setting up an appointment ... and there goes your muscle memory, all shot to hell.
First, here's a link a Microsoft article about "How to revert to an earlier version". It's pretty straightforward and the instructions are easy to follow:
https://support.microsoft.com/en-us/help/2770432/how-to-revert-to-an-earlier-version-of-office-2013-or-office-2016-clic
Basically:
As previously mentioned, the Version that is awful is 1906, Build 11727.20244 (maybe it will be changed/fixed in subsequent Versions/Builds, but not yet). How do you find your current Version/Build? It's on the same page as the screenshot above (Product Information), a couple of buttons down from there (About Outlook, or About Excel, etc.)
Now, I need to find the previous Office version. In a comment I found in a different post/conversation that I was reading about this problem, there was a link to a list of previous versions. Silly me, I should have stuck with the official suggestion in the "How to revert to an earlier version" article. I won't even bother posting this one, because it basically led me down the wrong path, as it only showed one update per month, when in fact there can be multiple Build updates per month.
I decided that I should go back at least until May, since the 1906 Version went back to mid-June and I remember seeing an early June post about the latest Version.
So I chose what I thought was the only update in May, Version 1905, Build 11629.20196. I followed the steps above and it updated perfectly to that Version/Build.
But, it didn't fix it. When I opened Outlook, it *still* had all that extra white space!!!! I double-checked that it had actually reverted to Version 1905 (described above), and it had. Darn, I needed to go back even further. Luckily that was easy enough.
This time, I went to the official "Update history for Office 365" (in the "How to revert to an earlier version" article under Step 2, Item 1) to see the previous versions:
https://docs.microsoft.com/en-us/officeupdates/update-history-office365-proplus-by-date?redirectSourcePath=%2fen-us%2farticle%2fae942449-1fca-4484-898b-a933ea23def7
I now saw that another May Version looked more promising: the final Build of Version 1904, Build 11601.20230, which was on May 22.
Since the Office Deployment Tool had already been downloaded, you don't have to download it again. Just change the config to a different version/build and run it all again (don't forget about turning off the auto-updates). That solved the issue ... Outlook is much nicer now!
Periodically check the "Update history for Office 365" link to see if a newer Version/Build has been released ... then you can turn the auto-update back on to see if they've done anything to fix that extra white-space debacle!! =0) And, of course, revert back if they haven't. =0(
I have Office 365, but I don't always receive the latest updates right away (I don't know why, and that's not really the subject of this post anyway ... although it *is* somewhat related ... more on that later). My Outlook finally updated to the latest version a week or two ago. The update was to Version 1906, Build 11727.20244. And, it is *AWFUL* !!!
First, a description of why it's so awful:
Short and sweet: too much extra white space!! I don't have that newest version anymore, I reverted to an earlier version (which is what this blog post is about), so I can't show you screenshots of mine before I fixed it, but I found some online that I can show you (sorry for the poor quality). This is in case you haven't had this Update applied yet and so you may not have seen this:Latest, Version 1906:
Whereas, here's what mine looks like now that I've reverted back to an older Version (I've changed my theme color to match the above screenshot ... I don't usually use this one, it's too much white).
My Reverted Version:
Wow! Big difference!!! No ridiculous extra white space!
Another example: composing an email …
Latest, Version 1906:
With this newest Version, there's an option on the ribbon to tighten up the spacing a little, which makes it look, like this:
Well, OK, it's not *as* bad ... but it's still way too much wasted space! If they hadn't added all that extra white space, they wouldn't have to tighten the spacing to begin with! Give me back my old version!
My Reverted Version:
I don't usually keep the Ribbon pinned, I just drop it down when I need it. You all know what ribbon bars look like, so I won't bother with another screenshot. I like my old version much better. A lot more compact and no wasted vertical space.
I never even looked at the Calendar with the latest Version 1906, but I hear that there were similar issues there. One complaint in particular was about moving the location of various options to a different spot when setting up an appointment ... and there goes your muscle memory, all shot to hell.
Now, let's fix this puppy!
First, here's a link a Microsoft article about "How to revert to an earlier version". It's pretty straightforward and the instructions are easy to follow:https://support.microsoft.com/en-us/help/2770432/how-to-revert-to-an-earlier-version-of-office-2013-or-office-2016-clic
Basically:
- Download and unzip the OfficeDeploymentTool exe (self-extracting).
- Create a Config.xml file to put the version you want to update to (as shown in the above link).
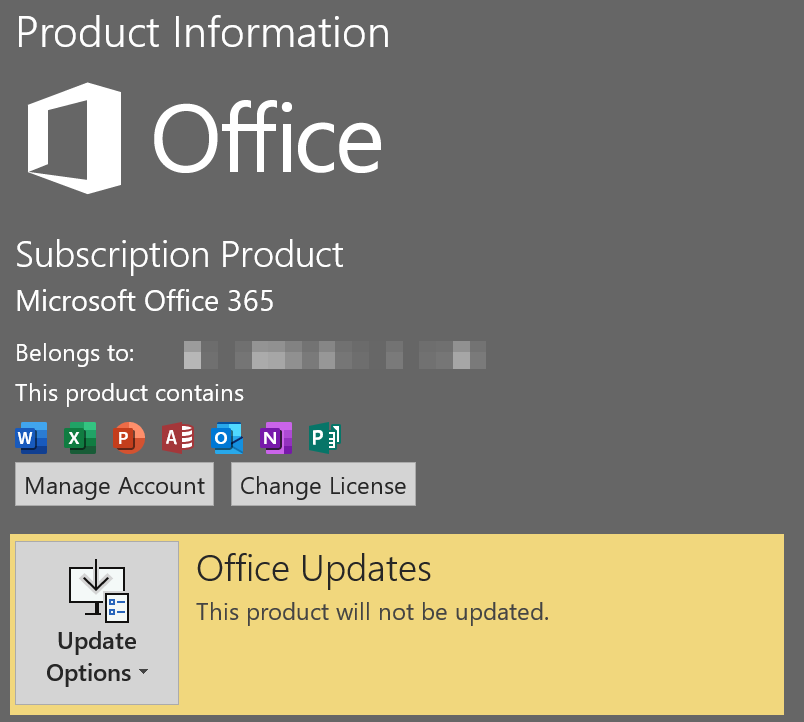
- Turn off Office auto-updates (see screenshots below)
- Run Setup.exe.
- Turn off Office auto-updates again (running Setup turns them back on). This part is important!!
To turn off Office auto-updates, open any Office application (Excel, Outlook, etc.), go to File | Account (or Office Account). On the right side of the screen you will see Product Information Office. Click on the Update Options button to disable auto-updating:
As previously mentioned, the Version that is awful is 1906, Build 11727.20244 (maybe it will be changed/fixed in subsequent Versions/Builds, but not yet). How do you find your current Version/Build? It's on the same page as the screenshot above (Product Information), a couple of buttons down from there (About Outlook, or About Excel, etc.)
Now, I need to find the previous Office version. In a comment I found in a different post/conversation that I was reading about this problem, there was a link to a list of previous versions. Silly me, I should have stuck with the official suggestion in the "How to revert to an earlier version" article. I won't even bother posting this one, because it basically led me down the wrong path, as it only showed one update per month, when in fact there can be multiple Build updates per month.
I decided that I should go back at least until May, since the 1906 Version went back to mid-June and I remember seeing an early June post about the latest Version.
So I chose what I thought was the only update in May, Version 1905, Build 11629.20196. I followed the steps above and it updated perfectly to that Version/Build.
What happened? It didn't work!!
But, it didn't fix it. When I opened Outlook, it *still* had all that extra white space!!!! I double-checked that it had actually reverted to Version 1905 (described above), and it had. Darn, I needed to go back even further. Luckily that was easy enough. This time, I went to the official "Update history for Office 365" (in the "How to revert to an earlier version" article under Step 2, Item 1) to see the previous versions:
https://docs.microsoft.com/en-us/officeupdates/update-history-office365-proplus-by-date?redirectSourcePath=%2fen-us%2farticle%2fae942449-1fca-4484-898b-a933ea23def7
I now saw that another May Version looked more promising: the final Build of Version 1904, Build 11601.20230, which was on May 22.
Since the Office Deployment Tool had already been downloaded, you don't have to download it again. Just change the config to a different version/build and run it all again (don't forget about turning off the auto-updates). That solved the issue ... Outlook is much nicer now!
Periodically check the "Update history for Office 365" link to see if a newer Version/Build has been released ... then you can turn the auto-update back on to see if they've done anything to fix that extra white-space debacle!! =0) And, of course, revert back if they haven't. =0(
Saturday, June 29, 2019
Long-Running Process On A Timer
I wrote a blog post a few years ago called Fire and Forget (https://geek-goddess-bonnie.blogspot.com/2017/03/fire-and-forget.html). It was about using Task.Run() to initiate a long-running process that doesn't need to be monitored by the user (like maybe running SQL scripts or Stored Procedures). The gist of that post was that using a Task.Run() runs the process in a separate thread (so it won't block the UI, if you're running from a UI) and it just does its thing without interrupting the rest of your program.
The post I'm writing now is slightly different, in that we want to run long-running processes, but we want to run them at short intervals. For example, to run a SQL Stored Procedure every second that will clean up old data in your database. Say that the Stored Proc *sometimes* finishes in that one second interval, but sometimes it takes more than a second. If this is the case, you don't want it to start the next iteration every second ... you'd want it to start the when the previous one finishes ... even if that previous one is taking 10 seconds.
An easy way to accomplish this is to use the System.Threading.Timer. Everything that runs in the Timer's Callback is run in a separate thread:
private long TIME_INTERVAL_IN_MILLISECONDS = 1000; // 1 second
private System.Threading.Timer timerRunLongProcess;
private void BtnStart_Click(object sender, EventArgs e)
{
    this.timerRunLongProcess = new System.Threading.Timer(RunLongProcess, null, TIME_INTERVAL_IN_MILLISECONDS, Timeout.Infinite);
}
private void RunLongProcess(object state)
{
    // Here you would put the code that runs a long process, maybe a call to a SQL Stored Proc or whatever it may be
    // This will actually run on a separate thread and won't interfere with the UI thread or the rest of your application
    // ...
    // You can simulate a long-running process like this:
    Console.WriteLine("It's time! Time is " + DateTime.Now.ToLongTimeString());
    Thread.Sleep(5000); // 5 seconds
    Console.WriteLine("Done! Time is " + DateTime.Now.ToLongTimeString());

    // This will get the timer going again for the next 1 second
    this.timerRunLongProcess.Change(TIME_INTERVAL_IN_MILLISECONDS, Timeout.Infinite);
}
Sunday, April 28, 2019
Passing Data Using Static Classes
Typically, when I see questions on the Forums about passing data between Forms, the questions are usually about passing data in, what I will call, the "classic" sense: two Forms are open, one is used for gathering data and the other is used for manipulating and/or displaying data. For those types of questions, I refer the person to my blog posts from many years ago:
http://geek-goddess-bonnie.blogspot.com/2011/01/passing-data-between-forms.htmlhttp://geek-goddess-bonnie.blogspot.com/2012/12/passing-data-between-forms-redux_31.html
And this one is often relevant too:
https://geek-goddess-bonnie.blogspot.com/2010/06/program-to-interface.html
I came across a question yesterday that at first seemed like it was going to be about passing data in the "classic" sense. Until I thought some more about what the person was actually asking about: the "data-gathering" Form was a Login Form and it would collect information from the user, an Account Number for example. They then wanted to display that information on all other Forms in the application. Since Login Forms are displayed at application start-up and then they "go away", we no longer have the ability to pass the data in the "classic" sense (two Forms are not going to both be open). Some other mechanism is needed.
This particular scenario with a Login Form, in my opinion, only requires a static class with static properties. For this application, I think that a singleton class would be overkill (because the class is only ever going to be populated at application startup and nowhere else or at any other time).
So, let's start with a static Account class:
public static class AccountClass
{
    public static string AccountNumber { get; set; }
    // plus, any other static info you'd like to share with your other Forms
}
In your LoginForm, perhaps after the user had clicked OK to login, you'd want to set the static members of the AccountClass:
private void OKButton_Click(object sender, EventArgs e)
{
    AccountClass.AccountNumber = this.txtAccountNumber.Text;
    // plus, whatever else you need to do in this button click
}
Then, in any other Forms where you need this information, get it from the static class. For example, to display the AccountNumber in a label on your Form, take care of that in the Form's constructor:
public CustomerForm()
{
    InitializeComponent();
    this.lblAccountNumber.Text = AccountClass.AccountNumber;
}
Happy Coding! =0)
Wednesday, February 27, 2019
Debugging Lambda / LINQ
Have you ever had a LINQ query or lambda expression and you couldn't for the life of you figure out why it wasn't working? To make debugging easier, you can actually set breakpoints on individual parts of the lambda expression. The query below is an example. Say that you're getting the error: System.FormatException: "Input string was not in a correct format." Judging from that, you think it is probably the int.Parse that is causing the problem, but what is the value of the row that's having an issue? So, set a breakpoint on the .Parse (just select Parse and hit F9), and if you don't have a lot of rows you could easily find the row where the "amount" column contains a non-numeric value.
Some people may be confused about the difference between lambda and LINQ. There is a good explanation in this StackOverflow thread (the second reply): https://stackoverflow.com/questions/34980144/difference-between-lambda-and-linq
I'll include some of that StackOveflow reply here:
----------------------------------------------------------------
This is LINQ:
But it can be written with a lambda expression:
The lambda part is b => b.Value == something.
Whereas:
uses a lambda expression (the m => m.SomeOp()), but has nothing to do with LINQ.
To make it easy, just remember that => is the lambda operator.
----------------------------------------------------------------
That’s it! I hope you’ve learned something about debugging lambda expressions! Happy coding! =0)
private void TestLambdaHowtoSetBreakpoint()
{
    // Highlight one (or several) of the lambda parts of this LINQ query (such as the .Sum or the .Parse)
    // and hit F9 to set breakpoints only on that part of the query! Awesome!
    var sum = this.dtGlobal.AsEnumerable().Select(row => row)
        .GroupBy(row => row.Field<string>("label"))
        .ToDictionary(grp => grp.Key, intField => intField.Sum(row => int.Parse(row["amount"].ToString())));
}
Some people may be confused about the difference between lambda and LINQ. There is a good explanation in this StackOverflow thread (the second reply): https://stackoverflow.com/questions/34980144/difference-between-lambda-and-linq
I'll include some of that StackOveflow reply here:
----------------------------------------------------------------
This is LINQ:
var a = from b in someList
        where b.Value == something
        select b;
But it can be written with a lambda expression:
var a = someList.Where(b => b.Value == something);
The lambda part is b => b.Value == something.
Whereas:
mock.Setup(m => m.SomeOp()).Returns(new Thing()); uses a lambda expression (the m => m.SomeOp()), but has nothing to do with LINQ.
To make it easy, just remember that => is the lambda operator.
----------------------------------------------------------------
That’s it! I hope you’ve learned something about debugging lambda expressions! Happy coding! =0)
Friday, January 25, 2019
Encryption for Messaging Exchange
Perhaps you're a regular reader here on my blog, but perhaps not. Those of you who have read some of my posts might remember that our application is a home-grown message bus system that is multi-threaded and runs as a Windows Service. It basically receives, processes and sends messages between instances of the application running on other servers. All this is usually done on a local network or domain, but the messages could also, in theory, be sent out over the Internet. In any case, Encryption is obviously a necessity.
I have already written two blogs that are not about encryption, per se, but *do* have to do with the encryption process we use in our application.
http://geek-goddess-bonnie.blogspot.com/2016/04/transport-rsa-key-containers.html
http://geek-goddess-bonnie.blogspot.com/2015/01/compress-decompress.html
For encryption, we use AES Encryption and utilize an RSA KeyContainer (stored at the machine-level rather than the user-level) for encrypting the AES symmetric keys (which we store, encrypted, in a database table).
Here are some links explaining the two types of encryption that are involved in my solution:
http://thebestvpn.com/advanced-encryption-standard-aes/#cipher
http://www.boxcryptor.com/en/encryption/
This is quoted from the first article:
Like nearly all encryption algorithms, AES relies on the use of keys during the encryption and decryption process. Since the AES algorithm is symmetric, the same key is used for both encryption and decryption.
... symmetric algorithms require you to find a secure method of transferring the key to the desired recipient.
This is quoted from the second article:
RSA works with two different keys: A public and a private one. Both work complementary to each other, which means that a message encrypted with one of them can only be decrypted by its counterpart. Since the private key cannot be calculated from the public key, the latter is generally available to the public.
AES is an excellent encryption algorithm, and is theoretically "un-crackable". With the only "drawback" being that it uses symmetric keys (as the first article above explains). But, symmetric key algorithms are significantly faster than asymmetric algorithms and can easily encrypt/decrypt large messages. RSA encryption is best for encrypting smaller messages, because it is slower. So a combination of the two is the best of both worlds: Generate your AES symmetric keys, Encrypt them with RSA and then you're able to send the RSA public keys anywhere.
This is the concept I will attempt to explain in this blog post. I have a downloadable solution for showing how this works. It uses two Windows Forms (AgencyOneMessageForm and AgencyTwoMessageForm) that "talk to" each other (by reading/writing files). This is only for ease of demonstrating the encrypt/decrypt process. Normally, the keys are stored in databases and the messaging between the multiple systems utilizes web service calls to send the messages (which are also stored in databases).
Download the demo code from here (GeekGoddessEncryptionDemo.zip)
The very first thing these demo Forms do is set up the RSA encryption. Note that if the KeyContainer doesn't already exist in the machine store (which, in case you're interested, is stored here: C:\ProgramData\Microsoft\Crypto\RSA\MachineKeys), it is created, then retrieved again every time the following code is run. In this demo, the two Forms use a different KeyContainerName, thus generating different RSA keys. In real-life these application would be on different physical machines and so would have different RSA keys even when they use the same KeyContainerName.
// Make sure you have this using
// using System.Security.Cryptography;

// Crypto methods
protected void SetupCrypto()
{
    CspParameters cp = new CspParameters();
    cp.KeyContainerName = this.KeyContainerName;
    cp.Flags |= CspProviderFlags.UseMachineKeyStore;
    this.KeyContainer = new RSACryptoServiceProvider(cp);
    this.PublicEncryptionKey = this.KeyContainer.ToXmlString(false);
}
Next, we set up the AES encryption. For this demo, we'll designate AgencyOne as the "Central Scrutinizer" (for those who don't "get" that, it's a reference to a Frank Zappa album called Joe's Garage). Anyway, what this means is that AgencyOne is the Controller, it controls the creation of the AES keys. Once it creates (and stores) the AES keys, the other Agencies in the system can join the group by sending their own Public RSA key to the Central Scrutinizer, which uses their Public key to encrypt the AES keys and send them back. The receiving Agency will save the encrypted keys, as is, in a file (in real life, in a database). That way, the same AES keys are used between all the Agencies in the group. Each Agency uses it's own RSA Private key to decrypt the encrypted keys that were just sent to it.
Here is what AgencyOne uses to create the AES encryption keys and store/retrieve from the AgencyOneKeys.xml file:
private void SetEncryptionKeys()
{
    // Normally, I retrieve (and save) the encrypted asymmetric AES keys from a database table.
    // But, for the purpose of this example (to make it easier to demonstrate), they are just being stored in an XML file.
    this.dsKeys = new DataSet();
    string fileName = this.AgencyName + "Keys.xml";
    if (File.Exists(fileName))
        this.dsKeys.ReadXml(fileName);
    else
    {
        this.dsKeys.DataSetName = "EncryptionDataSet";
        DataTable dtKeys = new DataTable();
        this.dsKeys.Tables.Add(dtKeys);

        dtKeys.TableName = "Encryption";
        dtKeys.Columns.Add("Agency");
        dtKeys.Columns.Add("EncryptionKey");
        dtKeys.Columns.Add("EncryptionIV");
        dtKeys.Rows.Add(dtKeys.NewRow());
    }

    DataRow row = this.dsKeys.Tables[0].Rows[0];
    string Key = row["EncryptionKey"].ToString();
    string IV = row["EncryptionIV"].ToString();

    if (Key != "" && IV != "")
    {
        // Remember, the Key/IV are stored RSA encrypted ... we have to decrypt them in order to use them
        EncryptionKey = this.KeyContainer.Decrypt(Convert.FromBase64String(Key), false);
        EncryptionIV = this.KeyContainer.Decrypt(Convert.FromBase64String(IV), false);
    }

    if (EncryptionKey == null || EncryptionIV == null)
    {
        // First time this is run, there won't be any keys set up. Create and save them now.
        this.Encrypter = new EncryptionClass();
        this.Encrypter.HashGuidsIntoEncryptionKeys(ref EncryptionKey, ref EncryptionIV);

        // encrypt with RSA public key, save to the file
        RSACryptoServiceProvider PublicRSA = new RSACryptoServiceProvider();
        PublicRSA.FromXmlString(PublicEncryptionKey);
        Key = Convert.ToBase64String(PublicRSA.Encrypt(EncryptionKey, false));
        IV = Convert.ToBase64String(PublicRSA.Encrypt(EncryptionIV, false));

        row["Agency"] = this.AgencyName;
        row["EncryptionKey"] = Key;
        row["EncryptionIV"] = IV;

        this.dsKeys.WriteXml(fileName);
    }
}
public void HashGuidsIntoEncryptionKeys(ref byte[] key, ref byte[] iv)
{
    string KeyGuid = Guid.NewGuid().ToString();
    string IVGuid = Guid.NewGuid().ToString();
    KeyGuid = KeyGuid.Replace("-", "");
    IVGuid = IVGuid.Replace("-", "");

    // Hash the GUID into byte arrays - Key is 32 bytes and IV is 16
    SHA256Managed Hasher = new SHA256Managed();
    Hasher.ComputeHash(Encoding.ASCII.GetBytes(KeyGuid));
    key = Hasher.Hash;

    Hasher.ComputeHash(Encoding.ASCII.GetBytes(IVGuid));
    byte[] result = Hasher.Hash;
    iv = new byte[16];
    for (int i = 0; i < 16; i++) iv[i] = result[i];
}
AgencyTwo also calls its own SetEncryptionKeys() method, which is slightly different than AgencyOne's because it doesn't have to create any AES keys, just decrypt the keys it has saved when it received them from the Central Scrutinizer:
private void SetEncryptionKeys()
{
    // Normally, I retrieve (and save) the encrypted asymmetric AES keys from a database table.
    // But, for the purpose of this example (to make it easier to demonstrate), they are just being stored in an XML file.
    this.dsKeys = new DataSet();
    string fileName = this.AgencyName + "Keys.xml";
    if (File.Exists(fileName))
        this.dsKeys.ReadXml(fileName);
    else
        return; // wait to join the Group

    DataRow row = this.dsKeys.Tables[0].Rows[0];
    string Key = row["EncryptionKey"].ToString();
    string IV = row["EncryptionIV"].ToString();

    if (Key != "" && IV != "")
    {
        // Remember, the Key/IV are stored RSA encrypted ... we have to decrypt them in order to use them
        EncryptionKey = this.KeyContainer.Decrypt(Convert.FromBase64String(Key), false);
        EncryptionIV = this.KeyContainer.Decrypt(Convert.FromBase64String(IV), false);
    }

    if (EncryptionKey == null || EncryptionIV == null)
        MessageBox.Show("Problem with " + fileName + ". Contains empty Encryption keys");
}
And, the last bit of code I will show here, the EncryptionClass:
public class EncryptionClass
{
    #region Declarations

    public byte[] EncryptionKey { get; set; }
    public byte[] EncryptionIV { get; set; }

    #endregion

    #region Constructors

    public EncryptionClass()
    {
    }
    public EncryptionClass(byte[] encryptionKey, byte[] encryptionIV)
    {
        this.EncryptionKey = encryptionKey;
        this.EncryptionIV = encryptionIV;
    }

    #endregion

    #region Public Methods

    public string Encrypt(string data)
    {
        return this.Encrypt(data, this.EncryptionKey, this.EncryptionIV);
    }
    public string Decrypt(string data)
    {
        return Encoding.UTF8.GetString(this.Decrypt(data, this.EncryptionKey, this.EncryptionIV));
    }
    public void HashGuidsIntoEncryptionKeys(ref byte[] key, ref byte[] iv)
    {
        string KeyGuid = Guid.NewGuid().ToString();
        string IVGuid = Guid.NewGuid().ToString();
        KeyGuid = KeyGuid.Replace("-", "");
        IVGuid = IVGuid.Replace("-", "");

        // Hash the GUID into byte arrays - Key is 32 bytes and IV is 16
        SHA256Managed Hasher = new SHA256Managed();
        Hasher.ComputeHash(Encoding.ASCII.GetBytes(KeyGuid));
        key = Hasher.Hash;

        Hasher.ComputeHash(Encoding.ASCII.GetBytes(IVGuid));
        byte[] result = Hasher.Hash;
        iv = new byte[16];
        for (int i = 0; i < 16; i++) iv[i] = result[i];
    }

    #endregion

    #region Private Methods

    private string Encrypt(string Text, byte[] key, byte[] iv)
    {
        byte[] TextBytes = Encoding.UTF8.GetBytes(Text);
        return this.Encrypt(TextBytes, key, iv);
    }
    private string Encrypt(byte[] TextBytes, byte[] key, byte[] iv)
    {
        try
        {
            AesCryptoServiceProvider RM = new AesCryptoServiceProvider();
            RM.Mode = CipherMode.CBC;
            ICryptoTransform encryptor = RM.CreateEncryptor(key, iv);

            // Create memory and crypto streams
            MemoryStream MStream = new MemoryStream();
            CryptoStream CStream = new CryptoStream(MStream, encryptor, CryptoStreamMode.Write);

            // Encrypt and put in byte array
            CStream.Write(TextBytes, 0, TextBytes.Length);
            CStream.FlushFinalBlock();
            byte[] CipherTextBytes = MStream.ToArray();

            // Close streams
            MStream.Close();
            CStream.Close();

            // Convert to Base64 string
            string CipherText = Convert.ToBase64String(CipherTextBytes);
            return CipherText;
        }
        catch (Exception ex)
        {
            throw new Exception("Error in Encrypt" + ex.Message);
        }
    }
    private byte[] Decrypt(string Text, byte[] key, byte[] iv)
    {
        try
        {
            if (string.IsNullOrEmpty(Text))
                Text = this.Encrypt("");

            AesCryptoServiceProvider RM = new AesCryptoServiceProvider();
            RM.Mode = CipherMode.CBC;
            ICryptoTransform decryptor = RM.CreateDecryptor(key, iv);

            // Convert string to byte array
            byte[] TextBytes = Convert.FromBase64String(Text);

            // Create memory and crypto streams
            MemoryStream MStream = new MemoryStream(TextBytes);
            CryptoStream CStream = new CryptoStream(MStream, decryptor, CryptoStreamMode.Read);

            // Decrypt to a byte array and close the streams
            byte[] DecryptedBytes = new byte[TextBytes.Length];
            int count = CStream.Read(DecryptedBytes, 0, DecryptedBytes.Length);
            MStream.Close();
            CStream.Close();

            // Create an array for return value and copy in the correct number of bytes
            byte[] returnval = new byte[count];
            Array.Copy(DecryptedBytes, returnval, count);
            return returnval;
        }
        catch (Exception ex)
        {
            throw new Exception("Error in Decrypt" + ex.Message);
        }
    }

    #endregion

}
When the app first starts, AgencyOne will create all its keys and store them in the AgencyOneKeys.xml. It will instantiate and Show() the AgencyTwo form, which will create its RSA keys and send the Public key to AgencyOne (which simply consists of saving a file called PublicKey.txt). You'll have to click on AgencyOne's "Receive Public Key" button in order to for it to get the file and send encrypted keys back to AgencyTwo (which simply consists of saving a file called EncryptedKeys.txt). After that, you'll have to click on AgencyTwo's "Receive Encrypted Keys" button in order to finish setting up AgencyTwo's keys (at which time, it will save a file AgencyTwoKeys.xml). Those two buttons will disappear from the Forms, as they are not needed once this initial "hand-shaking" has been done. You'll notice that if you run the application again.
Messaging is done much the same way. If you type into the top box and click "Send To" (One or Two), it will encrypt and send the encrypted message to the other Form (saving a file called MessageSent.txt). The other Form gets the message by clicking on "Receive From" (One or Two) reading the MessageSent.txt file, decrypting it and displaying it in the bottom box. There are default messages in both Forms in case you've not entered anything in the top box.
That's it, in a nutshell. Download the Demo to see it in action, plus any other little details I may not have included in this post. Again, the important part of this blog post is the encryption concepts and how (and why) to use them in a real world scenario, such as our messaging system. The Demo code is just to illustrate those concepts and to provide you with the encryption code necessary to implement your own encryption. But, you'll primarily use this messaging exchange kind of scenario in a back end server, you’d never use Windows Forms for communication in such a manner in a real world application.
But, I'm sure you'll find other uses for the encryption methodology I've shared with you today!
Happy coding! =0)
Friday, December 28, 2018
Event-Driven TCP
Merry Christmas and/or Happy Holidays! Happy New Year too! Here's a present for you ... the long-awaited, easy-to-use set of TCP Client classes that I use in my own applications (maybe abbreviated a bit, but not by much)!
First, let me start off mentioning the best site that I've found for an "almost perfect" class to use for easily writing event-driven TCP clients. The site is called DaniWeb: http://www.daniweb.com/software-development/csharp/code/422291/user-friendly-asynchronous-event-driven-tcp-client I say "almost perfect", because it needed some tweaking for my purposes.
I had initially made an addition of one Timer, and called it tmrTestConnection. It turns out that it was all that was ever needed, none of the other Timers in the original DaniWeb EventDrivenTCPClient class are necessary and can actually cause problems (or at least the way I needed to use this class). I also added several variables: m_LastReported, m_LastReceived (DateTime) and TCPFailureInterval (configurable), all dealing with connectivity.
Here's how my test Client application uses TCP:
- The Client connects to a TCP Server (I will provide a bare-bones Server example for your testing, in case you don't have a TCP Server handy).
- The Server can either respond to the Client (once a Connection has been established):
- by sending data (the Server retrieves some data from a File, which is part of the solution)
- or do nothing until the Client sends a "Handshake" message, and then respond to the Client by sending the data.
- by sending data (the Server retrieves some data from a File, which is part of the solution)
- That will, of course, depend on your application and the requirements of the Server that you are connecting.
- In my test example here, I originally wrote it so that the Server would send data as soon as the Client connects.
- But then decided to change it so that the Server waits for the "Handshake" message before sending any data.
- In my test example here, I originally wrote it so that the Server would send data as soon as the Client connects.
And, there's connectivity error handling:
- If the Server is not available when the Client first starts, the Client will continue to try to Connect, periodically logging Connect attempts at a configurable interval.
- If the Server goes down, the Client continually tries to Connect again, periodically logging Connect attempts at a configurable interval (in the tmrTestConnection_Elapsed event handler).
- While the Client is connected to the Server, if data is not received on a regular basis, it is logged periodically at a configurable interval (also in the tmrTestConnection_Elapsed).
There's too much code to post here in my blog. I'll post bits and pieces of it to illustrate the above points, but I've zipped up the two solutions and they are on my Google Drive: here’s the link for the Client and here’s the link for the Server . The Client zip file also includes the original code from DaniWeb (not added to the project, but the file DaniWeb.cs is with all the other files), but you should still take a look at the DaniWeb link that I posted at the start of this blog. It might be a good idea to download my zip files now and follow along:
The EventDrivenTCPClient is not supposed to be used directly. There is another class, TcpListener, that does the job of starting it up and hooking up a few events and then calling its Connect() method to get it all started. Here is the code for the StartListener() method in the TcpListener class:
protected virtual void StartListener()
{
    if (this.TestFromFiles)
    {
        this.GetDataFromFile();
        return;
    }
    this.TcpEvent = new EventDrivenTCPClient(IPAddress.Parse(this.ipAddress), this.Port);
    if (this.ReconnectInterval != 0)
        this.TcpEvent.ReconnectInterval = this.ReconnectInterval;
    this.TcpEvent.ConnectionStatusChanged += new EventDrivenTCPClient.delConnectionStatusChanged(TcpEvent_ConnectionStatusChanged);
    this.TcpEvent.DataReceived += new EventDrivenTCPClient.delDataReceived(TcpEvent_DataReceived);
    this.TcpEvent.Connect();
}
I'll explain the purpose of the TestFromFiles in a minute, because as you notice from the above code, it is not starting up anything! There is a method to my madness, however, and I will get to that soon.
So, if you're not testing from files, you'll receive the data from the Server in the TcpEvent_DataReceived() event handler. The TcpEvent (aka the EventDrivenTCPClient) fires the event whenever data is received from the TCP port. Now, here's where more work needs to be done, here in the TcpListener class ... because the data that is received from the TcpEvent, is in chunks based on the buffer size. We need to parse out that data into meaningful complete pieces of data.
In other words, the data received can be a partial set of data, in which case we have to continue waiting to receive the rest of the set ...Or it could contain the rest of the set and part of the next one, in which case, we'll do something with the complete set and wait to receive the rest of the next one ...
Or it could contain the rest of the set and complete multiple sets, in which case, we'll do something with the multiple complete sets.
I just so happen to have a BufferedDataParser class that will do just that (see the DataParser.cs file). The TcpEvent_DataReceived() event handler does only one thing: it calls the ProcessDataReceived() method, which makes use of the DataParser, like so:
protected void ProcessDataReceived(object data)
{
    if (this.DataParser != null)
    {
        List<string> DataList = this.DataParser.ProcessDataReceived(ref buffer, data.ToString());
        foreach (string Xml in DataList)
        {
            this.SendMessage(Xml);
            if (this.IsRunningFromConsole)
            {
                Console.WriteLine("******************* Begin Raw Data ***********************");
                Console.WriteLine(Xml);
                Console.WriteLine("*********************** End Raw  *************************");
                Console.WriteLine("Length: {0}", Xml.Length);
            }
        }
    }
    else
    {
        LogOutput.WriteLine("No DataParser!");
        if (this.IsRunningFromConsole)
            Console.WriteLine("Length: {0}", data.ToString().Length);
        this.SendMessage(data.ToString());
    }
}
Notice in the code above, the parameter "ref buffer" in the call to the DataParser.ProcessDataReceived(ref buffer, data.ToString()) method. That gives the continuity necessary for the DataParser to contain the entire partial set of data with every chunk of data received from the TCP port, until the Parser determines it has at least a full set of data (the current chunk of data may contain a partial set or multiple sets of data, hence the need for a List<string> returned from the Parser).
The BufferedDataParser is an abstract class, that is meant to be inherited by different kinds of Parsers that rely on receiving buffered data. I've included two different kinds of Parsers (one of which is demonstrated in the application). So, here's the abstract class:
public abstract class BufferedDataParser : IBufferedDataParser
{
    #region Declarations

    protected string HeartBeat = "<?xml version=\"1.0\" encoding=\"UTF-8\"?><ENDOFXML/>";
    protected string ValidStart = "<?xml version=\"1.0\" encoding=\"UTF-8\"?>";
    protected string ValidEnd = "</AXmlTargets>";
    protected bool IncludeDelimiters = true;

    #endregion

    #region Methods

    public List<string> ProcessDataReceived(ref string buffer, string dataReceived)
    {
        List<string> DataList = new List<string>();
        try
        {
            //add received data to the buffer
            buffer += dataReceived;

            this.RemoveHeartbeatData(ref buffer);

            int whileLoopWatchdog = 0;
            while (buffer.Length > 0)
            {
                this.RemoveDataPrecedingStart(ref buffer);

                //verify that a complete message is present, if so process just that
                string Complete = this.ProcessCompleteMessage(ref buffer);
                if (Complete.IsNotNullOrEmpty())
                {
                    string Xml;
                    if (this.IncludeDelimiters)
                        Xml = Complete;
                    else
                        Xml = this.ParseOutDelimiters(Complete);

                    DataList.Add(Xml);

                    //remove the data that was pulled out for processing
                    //this will replace multiple identical occurrences but that
                    //is fine
                    buffer = buffer.Replace(Complete, "");
                }

                //HACK: prevent endless while loop
                //(although 20+ complete sets of data at once probably wouldn't
                //happen, and if it did the remainder would be caught on
                //next data receive)
                whileLoopWatchdog++;
                if (whileLoopWatchdog > 20)
                {
                    whileLoopWatchdog = 0;
                    break;
                }
            }
        }
        catch (Exception ex)
        {
            LogOutput.WriteLine(ex);
        }
        return DataList;
    }

    protected virtual void RemoveHeartbeatData(ref string buffer)
    {
        int whileLoopWatchdog = 0;

        //remove any "heartbeat" data
        while (buffer.Contains(HeartBeat))
        {
            //this will replace multiple identical occurrences but that
            //is fine
            buffer = buffer.Replace(HeartBeat, "");

            //HACK: prevent endless while loop
            //(although 100+ heartbeats should never happen)
            whileLoopWatchdog++;
            if (whileLoopWatchdog > 100)
            {
                break;
            }
        }
    }
    protected virtual void RemoveDataPrecedingStart(ref string buffer)
    {
        //discard any text that precedes the valid start
        if (buffer.IndexOf(ValidStart) > 0)
        {
            buffer = buffer.Substring(
            buffer.IndexOf(ValidStart));
        }
    }
    protected virtual string ProcessCompleteMessage(ref string buffer)
    {
        string Complete = "";

        if ((buffer.StartsWith(ValidStart)) && (buffer.Contains(ValidEnd)) && (buffer.IndexOf(ValidStart) < buffer.IndexOf(ValidEnd)))
        {
            Complete = buffer.Substring(buffer.IndexOf(ValidStart),
            buffer.IndexOf(ValidEnd) + ValidEnd.Length - buffer.IndexOf(ValidStart));
        }

        return Complete;
    }
    protected virtual string ParseOutDelimiters(string Complete)
    {
        return Complete.Substring(Complete.IndexOf(ValidStart) + ValidStart.Length, Complete.IndexOf(ValidEnd) - ValidStart.Length);
    }

    #endregion
}
Some DataParsers, simply need to use different delimiters and let the base class handle everything else, like the StxEtxDataParser:
public class StxEtxDataParser :BufferedDataParser
    {
    public StxEtxDataParser()
    {
        this.HeartBeat = "no heartbeat";
        this.ValidStart = new string(new char[] { (char)2 });
        this.ValidEnd = new string(new char[] { (char)3 });
        this.IncludeDelimiters = false;
    }
}
STX/ETX are common delimiters for TCP transmissions. STX is a (char)2 and ETX is a (char)3.
The DataParsers.cs file also contains a CountDelimiterDataProcessor. It inherits from the BufferedDataParser also, but has a totally different way of parsing the received data. I won't post it here, you can check it out when you look at the downloaded zip file.
Now, as promised, I'll get back to the purpose of TestFromFiles: You should have sample data from the Server you're trying to connect to saved in a file. You obviously have to have this, or how would you ever be able to develop an application without knowing something about the data!?! By using this saved file to test from, you can quickly determine if your DataParser is parsing the data correctly without worrying about connecting to a Server. If there's a problem, keep refactoring your DataParser (not the abstract class! That one should not be touched!) until it's perfect.
I think that's about it for now. Download the two zip files and give it a test yourself. It's good to go "right out of the box" ... you only have to change the ipaddress (and port if you want to) in the app.configs of both Client and Server.
Happy Coding! =0)
Subscribe to:
Posts (Atom)


