I recently found some time to install the most recent version of Visual Studio 2017 and start using it for real work. I had actually had a few of the early pre-Release versions installed, but hadn't yet used them for anything other than "playing" (didn't want to use a pre-Release version for real work ... I'm not *that* much into "cutting edge"). I'd been so busy that I just continued using VS 2015 for work, even after the official release of VS2017.
What actually prompted me to install and start using VS2017 was that my laptop died. When I got the replacement, of course I had to re-install my entire development environment (not to mention a bunch of personal stuff not related to work). So, what the heck, might as well go with the latest and greatest!
I quickly found out that there were a few idiosyncrasies where things differed from my earlier VS 2015 version. I wanted to put some of it back to "my way":
- Some shortcut keys aren't what they used to be. But, short-cut keys are easy to change:
- Go to Tools > Options > Environment > Keyboard
- Find the command shortcut you want to change and in the "Press shortcut keys" textbox, just do as it says ... press the keys.
- Click OK when you're done
- For example, Building a Solution has been shortcut F6 for so many, many years (even before Visual Studio was designed) that it's ingrained in my finger muscle-memory. F6 is a "complement" to F5 (for Build and Execute Debugging). However, it seems to have changed at some point (I don't know if it changed in this VS version or some previous one) to Ctrl+Shift+B. I just could *not* get used to that, so I changed it back to F6 and now I'm happy.
- Outlining :
- The Outlining shortcut keys work a little differently than they used to in previous versions of VS.
- They all used to be specified as Ctrl+M, SecondKey ... but now it is Ctrl+M, Ctrl+SecondKey
- Just keep holding the Ctrl down during both M and SecondKey, rather than making it two different key combinations as shown.
- It works slightly different than in previous versions of VS, where either one of these worked:
- continuously hold down the Ctrl key
- or do Ctrl+M, let go of the Ctrl and type SecondKey
- Now, if you try that second option, you get an error and it does nothing.
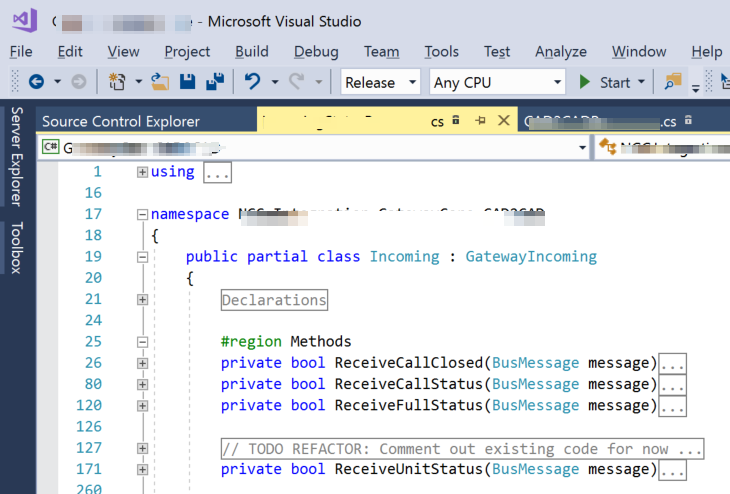
- Collapse to Definitions
- By default now, it does *NOT* Collapse the Regions! Arrgghh!! This particular "feature" is what prompted me to write this blog post, because it *really* irritated me!!! But, not to worry, it can be fixed. Yay!
- Tools > Options > Text Editors > C# > Advanced > Outlining > check "Collapse #regions when collapsing to definitions"
- CodeLens is a great feature and it's been around since at least VS2015 (although I wasn't using it then). Be aware that it's not available on the VS2017 Community edition (only Professional and higher). You can read about it here: https://docs.microsoft.com/en-us/visualstudio/ide/find-code-changes-and-other-history-with-codelens?view=vs-2017
- But, here's the downside ... it puts its cool little goodies just where I DO NOT WANT THEM!!
- Here's what my code looks like without CodeLens, nice and compact!
- Here's what it looks like with CodeLens, the look of my code is now quite annoying (to me anyway):

- But, you can disable the whole thing with an Options setting:
- Tools > Options > Text Editors > All Languages > CodeLens > uncheck "Enable CodeLens"
- I would really have preferred an option to change the position of where the CodeLens information is displayed, because as I said I believe some of what it does can be quite helpful. But, unfortunately, I don't think that there is anyway to do it, at least not that I know of.

Well, that's about it for now. So far, I'm glad it's a short list!! Happy Coding!! =0)

